


As a fellow introvert, the one thing that scared me the most about starting a business was the infamous: Live Client Presentation.
I didn’t like the idea of presenting my work to a live audience and possibly facing negative reactions on the spot. Plus, most of my clients are based in the US and Australia (I’m in Amsterdam!), so doing live presentations would also mean staying up late to match their timezone.
Thankfully, I’ve discovered a tool called Loom that allows me to pre-record my client presentations!
There’s a multitude of reasons why I love using Loom (that I’ll list below), but if you want to see a step-by-step process of how to use Loom for client presentations, you can also follow along in this video. Or keep scrolling to read my in-depth written version of this tutorial.
Reasons why I love using Loom for my business
1. My introverted self loves it
Using Loom relieves all of my anxiety around having to do live presentations. It’s a pretty magical discovery and has changed the way my business processes and the types of clients I am able to work with now. It has definitely helped me ease into becoming a confident business owner, especially at the beginning of setting up my business. Loom has a feature that allows you to turn on your webcam or keep it off and just record your screen, which means that on days I don’t have to get ready, I can still record a professional-client presentation without being on camera. My introverted self has thanked me many time!
2. Time Zones
My clients and I are typically a 6-9 hour time difference apart, making scheduling calls a complete disaster. I work with clients all over the world and I don’t plan to just serve a local client base anytime soon. Pre-recorded videos allow me to conveniently record them at any time and the same goes for my busy clients who can now watch them at their own convenience. Time Zones are not a thing you need to worry about with pre-recorded videos!
3. Efficiency
This may be controversial to some, but in my opinion, pre-recorded videos can be a lot more efficient than live presentations. When I was working my corporate job before starting my business, live presentations always left me feeling forced to give immediate feedback as the client. After sitting with my team and thinking it through, my feedback would typically change making me realize that gut feelings aren’t always the most accurate.
Using pre-recorded videos allows me to be more articulate and then allows my clients to thoroughly gather their thoughts and feedback before sharing them. Streamlining the complete process!
4. Create a personal experience
Loom allows you to continue recording your screen with a little bubble of your face in the corner! It’s a pretty genius invention that allows me to provide a much more personal experience to my clients. Running a complete digital business can make it hard to connect with your clients, but adding this simple touch to your client presentations can make them feel like you’re right in the room with them. By the way, Loom comes out with fun borders every season that you put around your camera bubble, but adds another layer of fun and personalized touch to your videos.
5. Content Creation
Now I don’t talk about this one in much detail in my YouTube video above, but I also love using Loom to create content for my business. In case you haven’t checked out my Youtube channel yet, almost 95% of my videos are of me filming some kind of tutorial using Loom. Loom allows you to film in high-definition AND 4K now, so that makes filming and editing beautiful videos a breeze now. All you have to do is download your video after it’s been processed, and you’re ready to use it in the video editing software or share that video directly.
How to use Loom
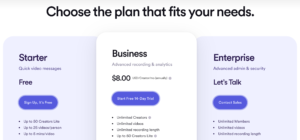
- First, you got to sign up for an account on Loom. They do have a Free Starter Plan, but it only allows you to create up to 5 minutes videos, and typically that’s way too short for a client presentation. So I’d recommend upgrading to their Business plan. The link I provided will give you a 14-day free trial for that!
- Once you have an account, I’d recommend downloading their free desktop app, because I find it works a lot smoother and then you can record anything on your screen and not just on a specific browser.
- When you’re ready for your video, just open up the app and you’ll get a choice to choose Screen Only or Screen & Camera. Then you can choose Full Screen, Window Size, or Custom Size. Tip: Custom Size allows you to create unique shaped videos if you only want to record a very specific part of your screen. Then make sure your recording settings are correct and choose your video quality/size. Typically I record in 1080p HD for client presentations and sometimes I go up to 1440p HD for videos I use for Youtube. And if you have a 4K monitor, you’ll also be able to record your full 4K videos as well! (pretty awesome)
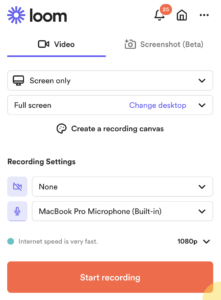
- Then hit Start Recording, and it’ll show you a 3-second countdown before it begins.
- During the recording, there are many things you can do like make your camera bubble bigger or smaller, pause your recording, and even pop some confetti on the screen! So I would recommend reviewing their shortcuts here so you’re ready to do them when you’re recording: https://support.loom.com/hc/en-us/articles/360002235818-How-to-use-Loom-s-keyboard-shortcuts
- When you’re video is complete, just hit Shift-Command-L , and your video recording will stop and automatically be saved to your account home page.
- Depending on how long your video file is, it may take a few minutes for the video to process. But once the processing time is complete, you can watch your video and either share the streaming link with your client or download the video for use somewhere else.
Features You Wish you Knew Earlier Using Loom Business:
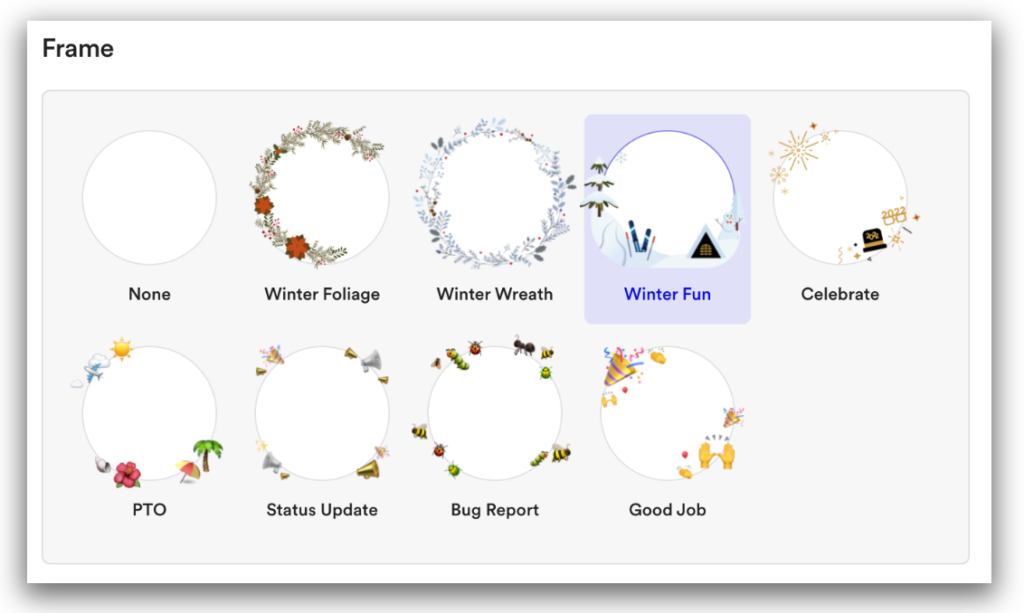
Camera Bubble Frames: Here are a few examples of the fun frames you can add to your camera bubble. I love using them to add a little pop of fun to my client videos!
Drawing Tool: When you hover over the ‘start-stop’ icon, you reveal the drawing icon. This feature allows you to draw on your screen to help guide your viewers throughout your loom recording. The cool thing is the drawing will disappear after 5 seconds!
In-Video comments: This feature actually allows your viewer to make comments and react with emojis at a specific moment in the video that you share. This makes it extremely easy for your clients to provide feedback quickly and you know exactly which part of the presentation they are giving feedback to. A comment icon or an emoji will show up over the video timeline, allowing you to see where all the reactions are placed. As an added bonus, viewers can also respond to your video with their own loom video all within one place.

Pause and Resume: This is a big one that I use all the time. During your recording, you can choose to pause your recording and resume it anytime. You can either use a Loom keyboard shortcut for this or using the control next to the camera bubble menu.
Shortcuts: As I mentioned earlier, Loom has a couple of keyboard shortcuts that will come in handy while you’re recording. You can find the list of shortcuts here: https://support.loom.com/hc/en-us/articles/360002235818-Recording-keyboard-shortcuts. My personal favourite shortcut is the Confetti shortcut: Command + Control + C. Not kidding you, you can pop confetti during your video. You should definitely try it out! It’s super cute.
Branded Elements: There are a few places on Loom that you can brand with your own logo and color scheme. In the Appearances tab, you can change the color of your play button and timeline, and also add your logo to the top right of your video player when you share your recording. We love a branded touch!
Give Loom a try if you’ve been trying to find a solution for your client presentations or even video content creation for your business. I’ve been using Loom Business for Made on Sundays for almost 3 years now and it’s helped me uplevel my client experience and save me so much time. If you just want to record videos that are under 5 minutes, you can use the free account forever. And then when you’re ready to upgrade, they give you a 14-day free trial on the Business account before you start paying.
If you’re more of a visual person and would prefer a video tutorial on how to use Loom, then check out my YouTube video where I show you my step-by-step tutorial on how I use it for my business at the top of this blog post.
I hope you found this helpful and be sure to sign-up for your Loom Account here.

Hey there!
I'm cheryl, the one behind this blog!
I'm a designer, brand expert, YouTuber, and avid traveler from Vancouver, Canada.
I quit my fancy corporate 9-5 a couple of years ago, hopped onto a plane and started Made on Sundays along with my new mindful lifestyle in Amsterdam.
Today I serve thousands of female entrepreneurs around the world, helping them clarify their brand story, design the brand of their dreams, and confidently show up to their soulmate clients.


